Getting Started in Photography: From Zero to Hero
Note: this is cross-published on Medium.
I truly believe anyone can take great photos—intentional shots, with attention to composition and lighting—to will their vision into reality.
I say this as someone who didn’t really know how cameras worked (until 6 months ago) at all. I never needed to, really: I grew up shooting photos on my family’s point-and-shoot, and later on an iPhone, where the automatic mode was more than sufficient. It wasn’t until I started shooting food for my baking Instagram that I realized there was a gap between my photos and others.

Samples of photos I identified as “good” food photography
What made these photos significantly better? There was a clear focus point, a shallow depth of field, which could achieve more than my iPhone camera in portrait mode could do, and the lighting was beautiful, or at least way better than my fluorescent kitchen light. I started off wanting to replicate those kinds of photos, but quickly found my interests expanding scope to portraiture and cityscapes.
Here’s what I want to share with you today: it doesn’t take a lot of money to learn about and produce great photographs. I learned everything I know on YouTube, for free, from amazing photographers whose work I now look up to. Here’s what it does take: consistent practice, attention to detail, and the willingness to learn and adapt your style. It also helps to have a camera that can operate in manual mode — I really like Sony’s mirrorless cameras, and you can pick one up for about $300 used on Amazon (this is a bargain compared to DSLRs!)
Note: if you have an iPhone, there’s still a lot you can pick up from this post and the YouTube links I’m sharing! I’d skip parts I-III. The most important thing to remember is that it’s not about the camera or the lens — it’s all about the person taking the shot. Good lighting and composition matter no matter what. 😉
I’m sharing all the YouTube links that have helped me along the way, along with my main takeaways in the hopes that it’s helpful for you on your photography journey. In some ways, I’m still a beginner. In other ways, I realize I’ve been practicing for years. Those iPhone and point-and-shoot photos from the beginning of my Instagram feed aren’t bad photos: I was intentional about composition and the “effect” of the photo, I just didn’t know why it was effective or how to exercise control over my photos.
Before we get into the details, I want to encourage you to look back through old photos you’ve taken: chances are you’ve taken a few that you can be proud of. If you really don’t take photos, go for a walk around where you live and snap some photos. You’ll probably find that you subconsciously know something about lighting and composition. Find something that you like about your pictures — I promise there’s something. :)
Now, let’s take it to the next level and learn about the guiding principles:
Part I: Camera Basics
First, take your camera off automatic mode. This is going to feel foreign and like you’re being thrown off the deep end, but stick with me. We’re smarter than our camera’s auto mode. Whatever AI sensor you have in your camera, it’s not that smart. You can pick the focal point better than your camera, and you can figure out the lighting better as well.
Once you have your camera in manual mode, you’ll have to adjust 3 settings to get the photo you want: aperture, shutter speed, and ISO. Here’s a chart that is often floated around:
VIa https://www.diyphotography.net. Good if you’re a visual learner.
This chart is hard to understand on its own, so I’d strongly recommend watching the camera basics YouTube tutorials I’ve linked below.
For each concept, I’ll list a few photographers who explain the same concept. Especially for the basics, it’s important to have a firm handle on what these settings are. You might find that you get it after watching just one photographer’s videos, or maybe you need to watch more. I will say, though, the best way to learn these settings is to practice! Photography is truly one of those activities that is biased towards action. Reading about it, while important, doesn’t hold a candle to taking as many pictures as possible. Take random photos of any object in your house (I have many test photos of a cactus tumbler, so yes, it can really be anything).
Peter McKinnon’s camera basics
Some of the above are a series of a few videos, as a FYI. I included photographers with very different styles so you can see that despite their differences, the content is much the same.
I personally think it’s important to have focus (no pun intended) when you’re starting out in photography — or at least, it’s helped me greatly. For example, I love shooting food, and lately I’ve expanded to taking photos of people as well. But I only shot food for a while (probably 4–5 months) to focus on getting one style of photography right. There are compositional techniques and styling that are unique to food photography that don’t apply to people, and vice versa. Narrowing your focus allows you to excel more quickly.
I’m going to focus this post on portraiture, since I’m guessing that’s most of what people want to get into photography for (either that or landscapes, and I really don’t know much about landscape photography at all!)
Part II: Focusing
In addition to the basics, it’s really important to understand how focusing works. I use single-point autofocus, which allows me to choose where in the frame I’d like to focus. Surprisingly, it works better than the AI-based autofocus! And it gives you more control over the composition of your shot. (This is really the common theme — taking control of whatever settings you can). I’d also recommend setting up back-button autofocus for you to focus and recompose your shots without losing focus (as opposed to the default shutter focus).
Helpful videos on focusing:
Pierre Lambert’s back button focus vs shutter focus
Tony Northrup’s explanation on back button focus
Part III: File Formats
This is important enough to deserve its own section, although it’s really easy to set up! Make sure you’re shooting in RAW not JPEG. Yes it takes up more room on your memory card, but you have way more data to play with in post production, and therefore more…you guessed it — control — over your image. You can always export to JPEG in your photo editing app (including the mobile apps), so you shouldn’t need the JPEG file at all (unless, of course, you’re short on memory).
Part IV: Lighting
I have the most fun taking portraits. There’s something awesome about getting to bring out someone’s best self, or maybe a side of them you didn’t expect. I personally love taking photos with natural light. That’s mostly because the sun is free and I don’t have to deal with buying and figuring out artificial light sources. But I also think the results are more beautiful!
Timing is everything when working with the sun. You’ll quickly learn that doing a photoshoot in the middle of the day can be tricky (unless you’re going for a harsher, dramatic look), and that golden hours are your best friend.
Why does timing matter so much? It has everything to do with the angle of the sun and the shadows that are cast. There are four different possible lighting situations when taking photos outdoors:
Direct sunlight — the sun is shining directly on your subject’s face. This can lead to harsh shadows, causes your subject to squint, and has the least flattering look. If you’re just starting out, I would avoid this situation (at least, I feel it’s hard to get a good shot in direct sunlight).
Side lighting — the sun is hitting your subject on one side of their face. I like these shots a lot because they give depth to your subject and can make for a more dramatic look without some of the harshness that I get with direct light.

I don’t have a great example of direct lighting, but the sun is harsher in this photo than I’d normally like for my photos! I decided to go for a side-lit shot for a more interesting look.
Backlighting — the sun is behind your subject. This is really pretty when the sun is almost behind your subject — you can catch a bit of sun flare, it lights up your subject nicely, and if you have a subject with long hair, it’s lit up beautifully. Note that it’s harder to autofocus if the sun is directly behind your subject, so you may have to use manual focus. I also find that while I love the look of these photos, they are a little harder to edit.
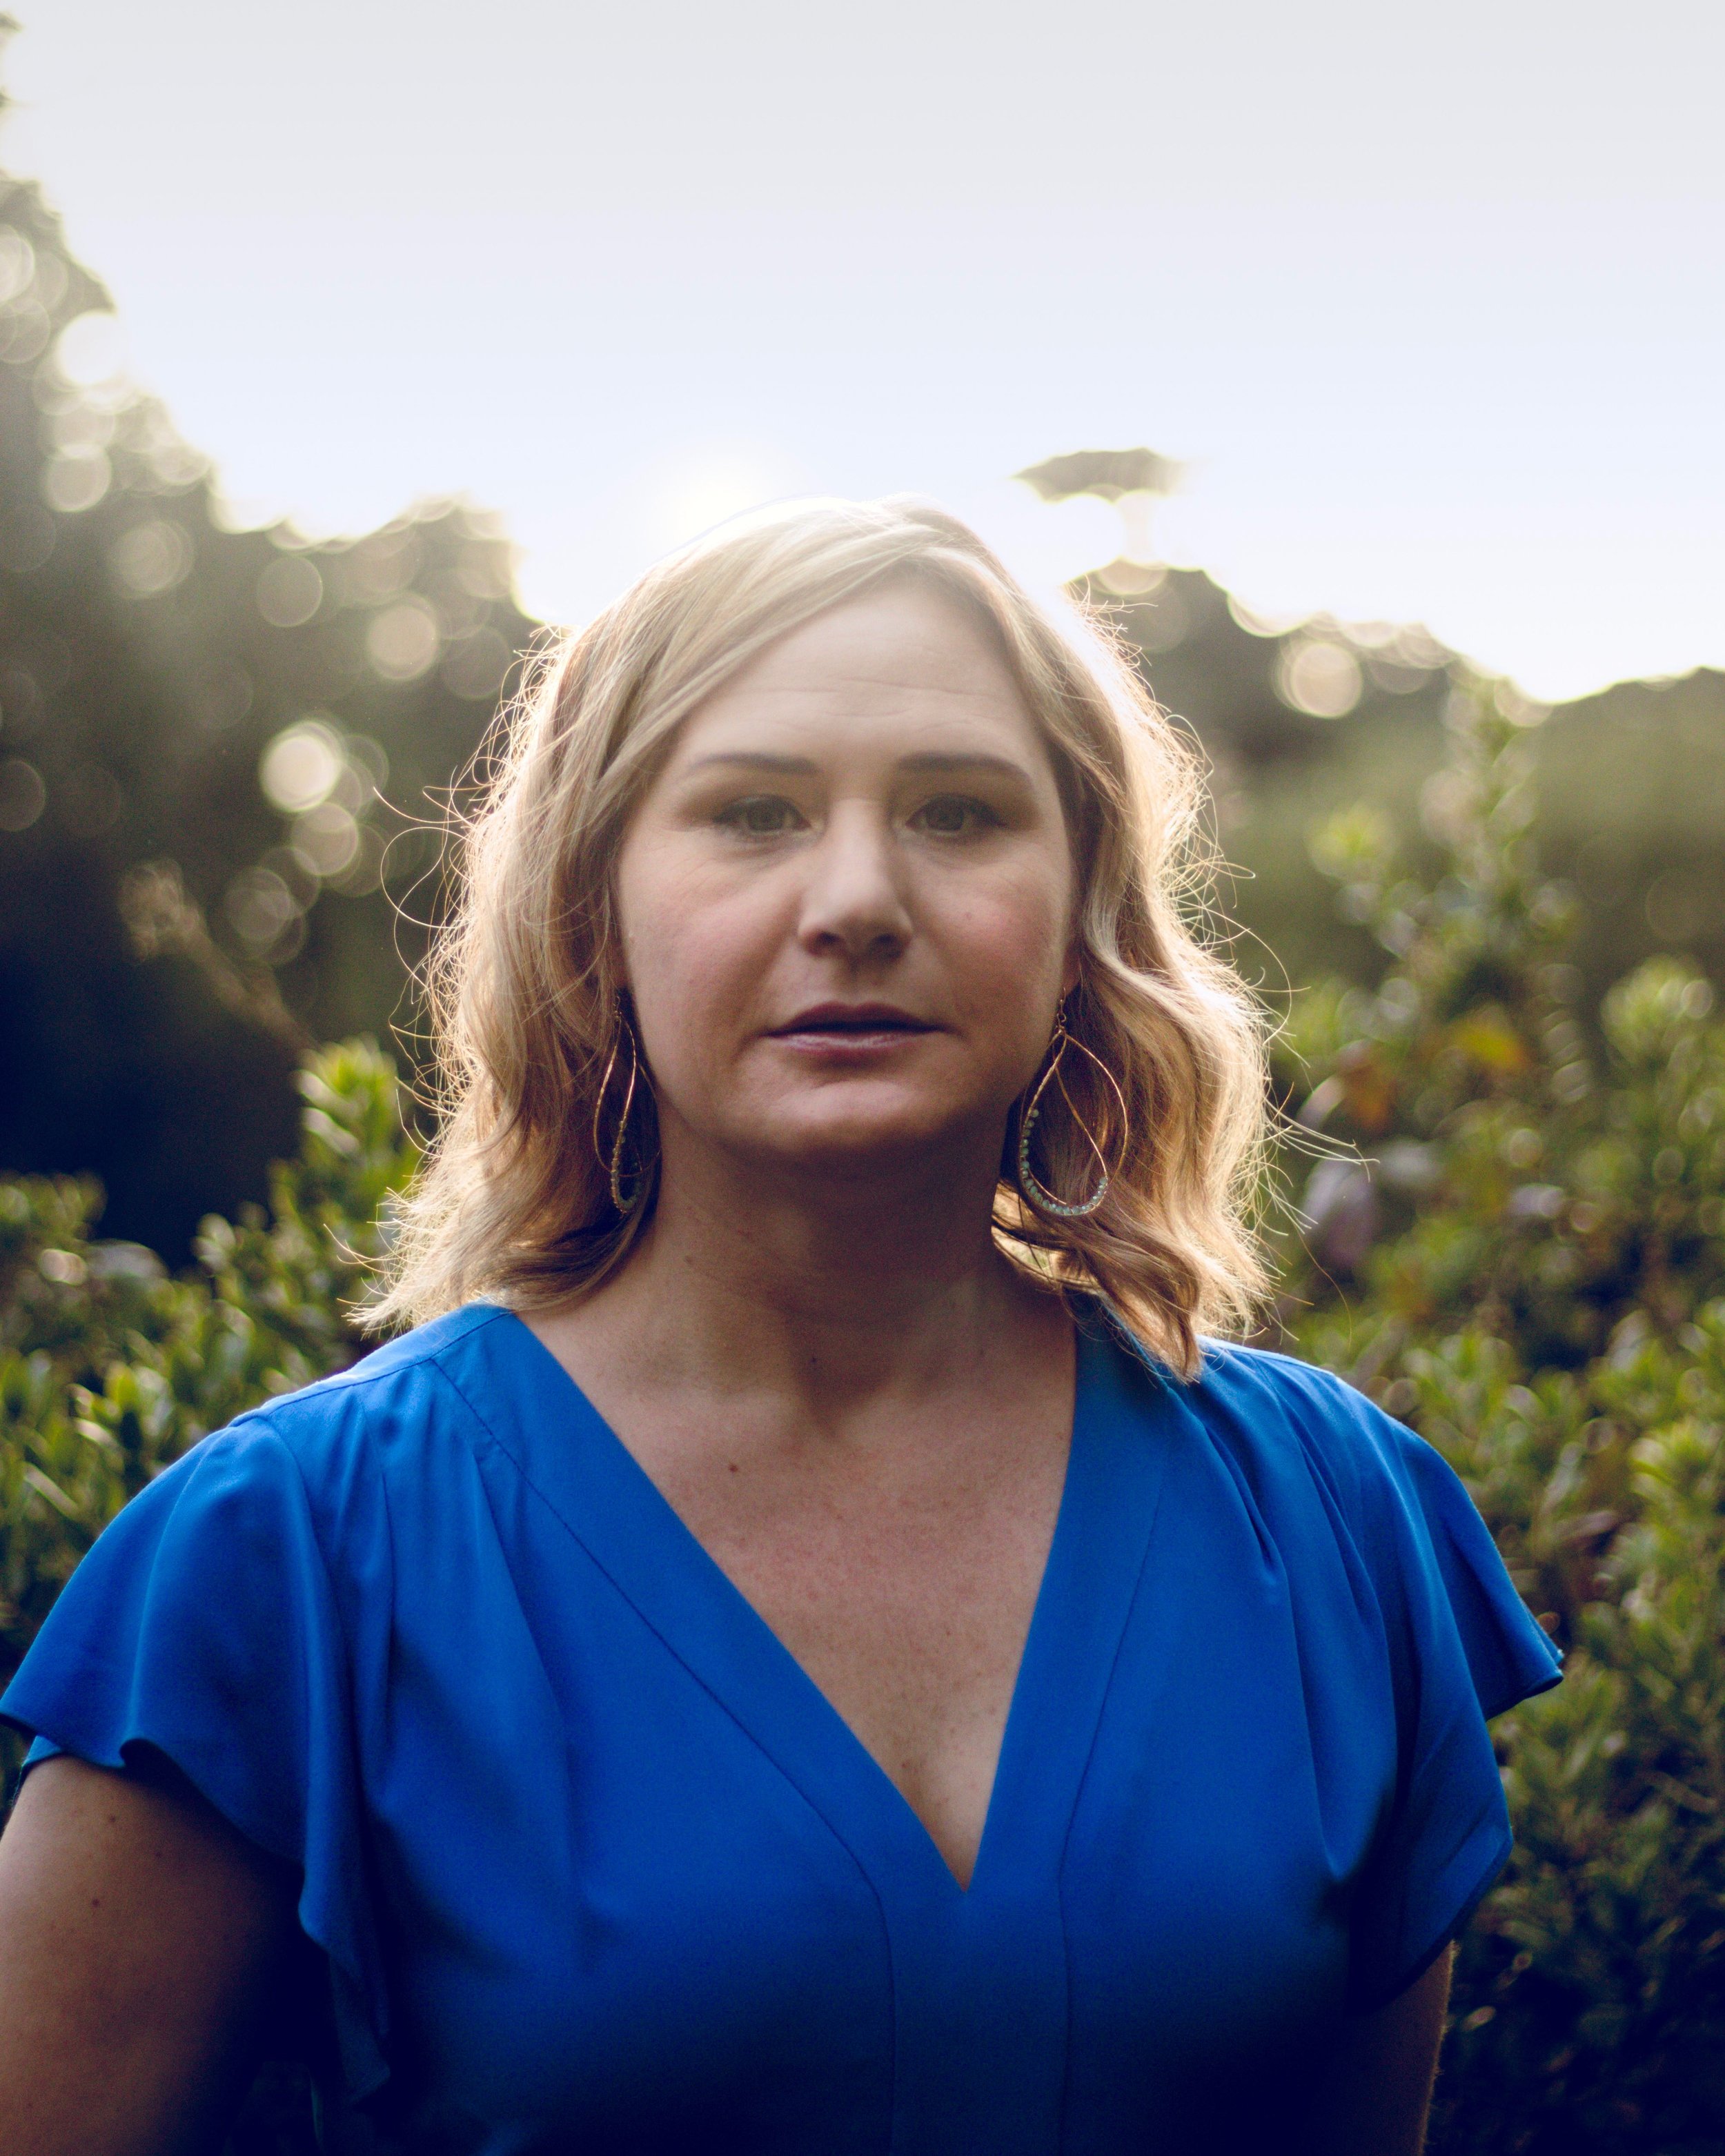
With backlighting, you can really catch the light in the model’s hair. I still really struggle to edit these photos though—you have to be really careful to not overexpose the photo.
Overcast/shade lighting — self-explanatory, you’re in the shade or the sun can’t really be seen. Overcast days, while they look gloomy, are most photographers’ favorite weather condition. The clouds diffuse the light beautifully, and you get this very even lighting on your subject’s face that’s the most flattering. Annie Leibovitz said in an interview that she hated when she had sunny photoshoot days. If you don’t have clouds but still want that even lighting, see if you can get in the shade.

The shade provides really even, beautiful light. It helps that this was also taken on an overcast day!
To learn more about lighting, I highly recommend Sean Tucker’s “Good Light” series, and actually recommend his whole channel in general. He’s produced my favorite photography videos, and his introverted style is a welcome change from the often energetic photographers on YouTube.
Sean Tucker’s “Good Light” series
Part V: Posing
Just as important as lighting is posing your subject. Here, knowing the fundamentals of composition is really important. It’s not just the rule of thirds, but understanding depth of field (which is produced by using a low aperture). In addition, knowing how to avoid awkward poses makes all the difference in your shots. This is what I struggle with most — I have a few go-to pose cues that I use, but it’s hard to get something unique! My biggest suggestion here is to watch photographers’ behind-the-scenes videos. These are awesome for seeing how they work during a photoshoot, how they direct their subjects, and how you can pick up similar techniques.
The most important thing I’ve learned here is to communicate very frequently with your subject. Tell them where you want their hands, what you want their expression to be. If you’re moving away or towards them, tell them that so they know what to expect! Lastly, I find that especially for women, I need to adjust their hair to get rid of flyaways, etc. Always ask for consent before touching your model. It should go without saying, but sometimes, it’s easy to get stuck in your own world and forget the small (but important) details!
Julia Trotti’s “How to Pose People who are not Models”
Peter McKinnon’s composition tips
Mango Street’s “How to Pose Friends who aren’t Models” (3-part series)
Irene Rudnyk’s BTS indoor shoot
Part VI: Editing
I truly believe that editing is half the photo. It’s possible to get a lot of what you want your final look to be in camera, but even with all your settings in just the right place, it’s likely you’ll want to adjust the exposure, play with the colors a bit, etc.
The go-to editor for photography is Lightroom. It’s a stripped down version of Photoshop (and therefore less intimidating than Photoshop), but is pretty powerful and I feel has more flexibility than a lot of the other mobile photography apps I’ve used in the past. My advice: play with everything! I really like using the curves feature as well as editing the presence of different colors in a photo. For example, since I shoot outside a lot, I get a lot of greens in my photo. Often, though, I find that the greens are too green. By playing around with the hue and saturation of different colors, I’m able to shift those greens to a more yellow-green which helps focus the attention on the subject. Especially in portrait photography, the subject is the only thing that matters. To that end, I tend to clone stamp (use the “healing” tool in Lightroom) to take out distracting items, like smudges of dirt, phone lines, etc.
There are SO many videos on how to edit in Lightroom! I’ll link a few, but I suggest watching how other YouTubers do it, and even more than that, just editing a ton and experimenting with photos you already have.
Sean Tucker’s How To Edit Color (I learned from this to look at movie color schemes, and that’s all I thought about when watching Captain Marvel. Now I really want to play with teal and red color grading!)
Jessica Kobeissi’s Bringing Back Dark Backlit Photos (to my point above)
Julia Trotti’s How To Use Lightroom RGB Tone Curve
Part VII: Style
This is the hardest part, but also the most fun. How do you develop your own personal style for photography? What do you want your style to be? Natural, vibrant, playful, dramatic, thoughtful? What I’ve found helpful is to have photographers whose work I look up to and use as an inspiration for me to think about what I’d like to achieve creatively with my photos. Of course, not every photoshoot might adhere to what you want your style to be, but again, the best way to figure it out is through practice. I still have NO idea what I want my style to be.
Right now, I think Nirav Patel’s style is my favorite — I love how he plays with key lights, fog, and shadows. If you’re looking for something very ~aesthetic~ I have to recommend checking out Brandon Woelfel’s work. They’re both great examples of seeking out a unique style so that when you look at a photo, you know they’re the ones who took it.
Addendum: what camera / lenses do I buy?!
I’ve watched so many YouTube videos on this. So many. Like… many hours worth. Your first question might be: what camera and lenses do you have, Sravanti?!
I’m currently shooting on a Canon 80D (refurb) and a 50mm/1.8 lens. I also have the 60mm/2.8 macro lens (great for food photography). I do not have a kit lens/zoom lens.
I chose the 80D because I think I’d like to try my hand at video work later this year, and the 80D is good for photos and videos and is generally a great all-around camera. I’ve also been told that the autofocus on this camera is super fast and that the photos come out sharply compared to other APS-C sensor cameras. I still stayed with an APS-C sensor, just because it’s significantly cheaper than a full-frame camera. I chose Canon because I liked how the camera felt in my hand and really love how the colors for food photography turn out on a Canon lens. If you have the opportunity, try out different bodies and types of cameras! (Best Buy is a good place for this). See what feels right in your hand and go with that—there is no wrong brand (I think. I hope? At least among the well-known ones. The YouTubers I follow all shoot either Nikon, Canon, or Sony).
Why don’t I have a kit lens? For me, it came down to what I wanted to focus on. I knew I wanted to focus on portraiture and food photography. The 50mm/1.8, or “nifty fifty” is a great lens to start out with. 50mm — which on a APS-C sensor, aka crop sensor, is equivalent to a 80mm — is an ideal focal length for portraiture as it distorts the face less than, say, a 35 mm.
(A brief aside: the actual focal length of this lens is 80mm since my camera sensor crops by 1.6x, so 50*1.6=80. If I were shooting on a full frame, I’d probably have the 85mm for portraiture).
I have the 60mm (so 96mm equivalent) macro because macro lenses are great for food photography. You get that up close detail and it’s a great focal length for getting close to the food.
I kind of regret not having a kit lens — you can still get good results with kit lenses, although I knew I’d be annoyed if I couldn’t go down past f3.5. I love blurring the background to get that bokeh, so for that reason and to shoot better in low light, it makes sense to have a 1.8 aperture. The nice thing about the kit lens is that it’s a zoom lens — something like the 50mm is a prime lens, meaning it doesn’t zoom. It can become awkward if you need a different focal length, but on the other hand it forces you to move around with your body, which I think means you’re more intentional about your composition. If you’re planning on taking photos during travel, though, I think a kit lens is a must (which probably means I need to buy one soon!)
There are SO many videos out there on lens reviews. I found Chris Winters to be straightforward and helpful, and he provides recommendations for virtually every budget, which I appreciated.
Chris Winters’ YouTube channel
Phew!
If you’ve made it all the way down here, give yourself a pat on the back. That’s so much material to get through! I hope it helped, and definitely feel free to reach out if I can be helpful. Lastly, a plug for my photography services (based in San Francisco):
If you’re looking for your next LinkedIn headshot, new Instagram photos, or what not, feel free to reach out! I have mini sessions (4–5 edited photos) starting at $60 as I build out my portfolio, and I do hour-long photoshoots as well if you’re interested. If you’re interested in food and restaurant photography, I’m happy to discuss rates for those as well. If you refer someone, I’ll knock off $10 for both you and the person you refer! Holler on Twitter (Sravanti Tekumalla) or send me an email at sravanti150@gmail.com.
And follow me on Instagram, where I post almost daily: @sravantea, food Instagram: @theexperimentalbaker.